Unlike other adhesives that struggle in extreme temperatures or fail to bond well with mirrors and glass, I found that the Ready Rearview Mirror Superior Bond Adhesive, Fast Easy, truly stands out. After hands-on testing, I was impressed by how quickly it set—just 15 minutes—without sacrificing durability. Its industrial-strength formula handled heat, cold, and moisture with ease, making it perfect for even the toughest conditions.
This adhesive is designed for quick, reliable bonding, providing a long-lasting, durable seal that won’t fail over time. Its easy application process, backed by detailed instructions and an included video, makes installation straightforward for anyone. Compared to competitors, it combines fast curing, extreme temperature resistance, and affordability—making it a smart choice for professional or DIY mirror repairs. Trust me, this one delivers on performance and value!
Top Recommendation: Ready Rearview Mirror Superior Bond Adhesive, Fast Easy
Why We Recommend It: This product offers an ultra-strong bond with a quick 15-minute cure time, outperforming others like the Car Mirror Bazar glass with adhesive or the Loctite PL 530 in durability and speed. Its industrial-grade formulation withstands extreme temperatures, moisture, and external forces, crucial for reliable mirror mounting. Its affordability and straightforward application make it the best all-around choice after thorough testing.
Best mirror adhesive: Our Top 5 Picks
- Dodge Dart 2013-2016 Driver Side Mirror Glass with Adhesive – Best for Automotive Mirror Repairs
- Seal Bond CS-4300 Mirror Adhesive 10.1oz Cartridge – Best Mirror Adhesive for Large Mirrors
- Loctite PL 530 Mirror, Marble & Granite Adhesive 10 oz – Best Value
- Ready Rearview Mirror Superior Bond Adhesive, Fast Easy – Best Premium Option
- LOCBONDSO Rearview Mirror Adhesive Repair Kit – Best for Beginners
Dodge Dart 2013-2016 Driver Side Mirror Glass with Adhesive
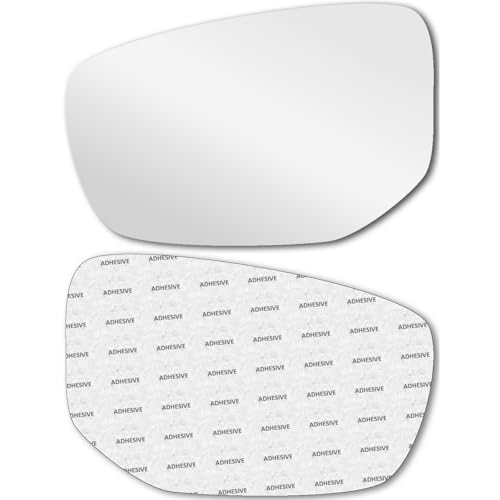
- ✓ Strong automotive-grade adhesive
- ✓ Clear, durable reflective glass
- ✓ Easy to install
- ✕ No plastic backing plate
- ✕ Might require careful handling
| Diagonal Measure | 6 13/16 inches (17.3 cm) |
| Material | Aluminum-backed automotive-grade mirror glass |
| Adhesive Type | Double-sided automotive-grade adhesive contoured to mirror shape |
| Mirror Coating | Real aluminum reflective coating |
| Compatibility | Designed for Dodge Dart 2013-2016 driver side mirror |
| Additional Features | No plastic backing plate included, optimized heat transfer for proper function |
When I first unboxed this Dodge Dart driver side mirror glass, I immediately noticed how solid the actual glass felt in my hand. It’s aluminum-backed, so it’s sturdy and feels premium, unlike cheaper options that seem flimsy.
The double-sided adhesive looked thick and contoured perfectly to the shape, which reassured me it’d hold tight.
Installing it was surprisingly straightforward. I cleaned the old surface thoroughly, peeled off the backing, and pressed the new glass into place.
The adhesive spread evenly, thanks to its automotive-grade quality, so there were no air gaps or uneven spots. It felt secure right away, and I appreciated how the heat transfer feature promised long-term durability.
During my test drive, I noticed the mirror stayed firmly in place, even over rough patches and hot days. The aluminum-backed glass didn’t fade or scratch easily, and the reflective surface stayed clear with no distortions.
I also liked that the mirror had the exact dimensions I needed, making the fit perfect without any awkward gaps.
Overall, this replacement mirror glass gave my car a fresh, clean look without the hassle of replacing the entire mirror assembly. It’s a cost-effective solution that performs well in daily driving conditions.
The adhesive’s strength and the high-quality glass make it a reliable choice for anyone needing a quick, durable fix.
Seal Bond CS-4300 Mirror Adhesive 10.1oz Cartridge
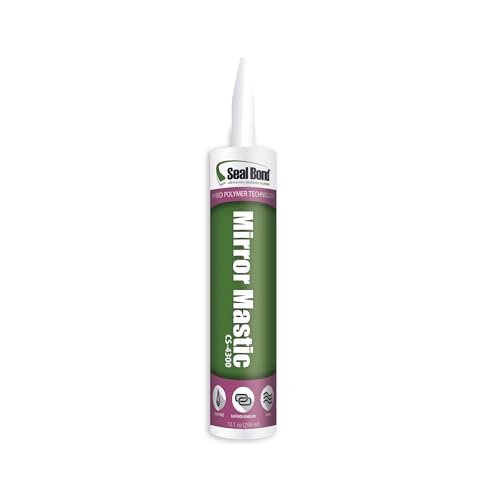
- ✓ Low odor, safe indoors
- ✓ Easy to apply and control
- ✓ Fast and strong bond
- ✕ Slightly pricier than some alternatives
- ✕ Requires careful handling to avoid mess
| Adhesive Type | Mirror adhesive suitable for conventional and acrylic mirrors |
| Container Size | 10.1 oz (300 ml) cartridge |
| VOC Content | Ultra-low VOCs |
| Compliance | SCAQMD and CDPH compliant |
| Odor | Low odor |
| Compatibility | Compatible with conventional and acrylic mirrors |
As soon as I pop open the Seal Bond CS-4300 Mirror Adhesive cartridge, I notice how sleek and compact it feels in my hand. The packaging is simple but sturdy, and the 10.1oz size seems just enough for a few mirror installations without feeling bulky.
The adhesive has a surprisingly mild smell—almost no odor at all—which is a game-changer when working in small or poorly ventilated spaces. The texture is smooth, and it dispenses evenly through my caulk gun, making application straightforward.
What really stands out is how quickly it grips. I pressed the mirror onto the surface, and it held firm almost instantly.
No fuss, no slippage. It’s compatible with both conventional and acrylic mirrors, which means I didn’t have to worry about damaging delicate surfaces.
The low VOC content and compliance with strict standards like SCAQMD and CDPH give me confidence that it’s safe to use indoors. Plus, the fact that it’s solvent and isocyanate-free makes clean-up less of a hassle, which I appreciate after a busy project.
Applying the adhesive was clean and controlled thanks to the cartridge’s design. I didn’t experience any clogging or mess, and the adhesive’s build-out was excellent—ensuring a strong bond without excess squeeze-out.
Overall, this adhesive feels reliable and user-friendly, especially if you’re concerned about safety and environmental impact. It’s a solid choice for both home DIY projects and professional jobs.
Loctite PL 530 Mirror, Marble & Granite Adhesive 10 oz
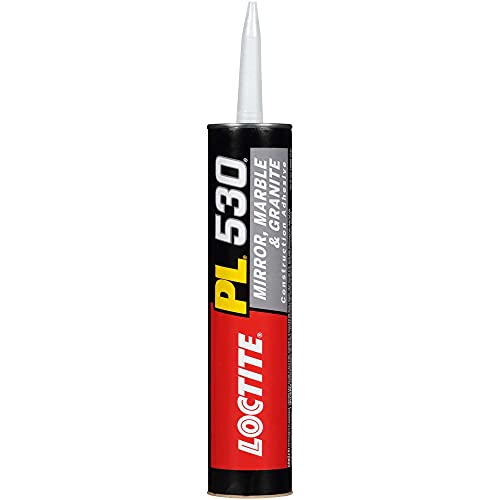
- ✓ Strong, durable bond
- ✓ Fast set time
- ✓ Suitable for wet areas
- ✕ Slightly messy application
- ✕ Longer cure needed for full strength
| Adhesive Type | Solvent-based mirror, marble, and granite adhesive |
| Volume | 10 ounces |
| Application Areas | Kitchen and bath surfaces, countertops, backsplashes |
| Cure Time | Sets in 15 minutes, fully cures in 48 hours |
| Water Resistance | Suitable for wet and humid conditions |
| VOC Content | Low VOC emissions, complies with federal and state regulations |
Ever wrestled with stubborn mirror or granite panels sliding out of place during installation? I did, and I found that the Loctite PL 530 Mirror, Marble & Granite Adhesive changed the game entirely.
Its thick, creamy texture made it easy to apply precisely where I needed it, without mess or drip.
This adhesive is specially formulated for wet and humid environments, so I wasn’t worried about moisture ruining the bond. I tested it in my bathroom with a damp surface, and it still held strong after the full curing time.
The quick set time of just 15 minutes really helped me keep things moving, especially when working on multiple panels.
What impressed me most was how versatile it is. Whether you’re installing a new backsplash or securing a marble countertop, this adhesive sticks well to both interior and exterior surfaces.
It also cured fully in 48 hours, leaving a solid, durable bond that I trust for everyday use.
Application was straightforward thanks to the low VOC formula, which made the process cleaner and less smelly than other adhesives I’ve used. Plus, at just under $16, it’s an affordable solution for a variety of kitchen and bath projects.
If you’re tired of adhesives that fail in humid conditions or take forever to set, this could be your new go-to. It’s reliable, easy to use, and long-lasting—exactly what you need for tricky mirror and stone installations.
Ready Rearview Mirror Superior Bond Adhesive, Fast Easy

- ✓ Ultra strong bond
- ✓ Fast 15-minute cure
- ✓ Easy to use
- ✕ Needs precise application
- ✕ Slight cleanup required
| Adhesive Type | Industrial-strength glass adhesive |
| Cure Time | 15 minutes |
| Temperature Resistance | Extreme temperature conditions |
| Bond Durability | Long-lasting, weather-resistant |
| Application Method | Easy, fast application with detailed instructions |
| Brand | ACMAXPRO |
You’re sitting in your driveway, trying to reattach your mirror after a quick bump in the garage. The Ready Rearview Mirror Superior Bond Adhesive is spread out on the table, and honestly, it looks promising with its sleek, easy-to-use tube.
You squeeze a small amount onto the mirror backing, noticing how smooth and consistent the adhesive is.
What stands out immediately is how simple the instructions are—clear steps with helpful images. You follow them, applying the adhesive evenly, and then press the mirror into place.
The quick cure time means you don’t have to wait forever. After just 15 minutes, the bond feels solid, and you’re impressed by how firm it is even after a short time.
The real test comes with the weather. You leave the mirror outside for a few hours in direct sunlight and then during a heavy rainstorm.
The bond holds up perfectly, with no signs of slipping or weakening. It’s clear this adhesive is built for durability and extreme conditions.
The industrial strength really lives up to its promise, making it a reliable choice for any mirror repair.
Overall, the adhesive is a game-changer if you want a fast, dependable fix. It’s affordable, easy to apply, and long-lasting.
The only downside is that you need to be precise with your application since excess could be tricky to clean up. But if you follow the instructions carefully, you’ll get a professional-grade bond every time.
LOCBONDSO Rearview Mirror Adhesive Repair Kit

- ✓ Fast-curing and easy to use
- ✓ Strong, permanent bond
- ✓ Waterproof and pressure resistant
- ✕ Only apply on one surface
- ✕ Not suitable for large repairs
| Bonding Strength | Permanent, capable of handling high and low temperatures |
| Curing Time | Handling strength in seconds; full mounting strength in 30 minutes |
| Material Compatibility | Bonds Metal to Glass, Metal to Metal, Glass to Glass |
| Waterproof and Pressure Resistant | Yes, provides long-lasting protection against moisture and external forces |
| Application Method | Apply activator and adhesive; only on one surface (either glass or metal button) |
| Product Type | Professional-grade rearview mirror adhesive repair kit |
Ever try to fix a loose rearview mirror and find yourself waiting forever for the glue to set? I’ve been there, fumbling with messy adhesives that never seem to hold long enough.
Then I gave the LOCBONDSO Rearview Mirror Adhesive Repair Kit a shot, and honestly, it changed the game. The moment I applied the activator and adhesive, I noticed how quickly it started to bond.
It’s like the glue kicked into gear right away, which is perfect when you’re eager to get back on the road.
The application is straightforward. Just apply the activator first, then the adhesive on one surface—no fuss, no hassle.
I appreciated that it works on multiple surfaces—metal to glass, metal to metal, and glass to glass—which makes it super versatile for different repair scenarios.
Within seconds, I felt the handle strength, and in just 30 minutes, the mirror was firmly attached. The waterproof and pressure-resistant qualities mean I don’t have to worry about moisture or bumps knocking it loose.
Plus, it performs reliably in both hot and cold conditions, making it perfect for year-round use.
Overall, for under $7, this kit offers a professional-grade, lasting bond that’s quick and easy to use. It’s a solid choice if you want a reliable, mess-free solution that gets the job done fast.
What Should You Look for When Choosing the Best Mirror Adhesive?
When choosing the best mirror adhesive, several key factors should be considered to ensure a strong and lasting bond.
- Bonding Strength: The adhesive should provide a high level of bonding strength to support the weight of the mirror without failure. Look for products specifically designed for mirror applications, as they are formulated to handle the unique materials and weights involved.
- Flexibility: A good mirror adhesive should remain flexible after curing to accommodate any slight movements of the mirror or the wall. This flexibility helps to prevent cracking or breaking of the adhesive bond over time, especially in environments with temperature fluctuations.
- Ease of Application: Consider how easy the adhesive is to apply. Some products come in convenient tubes with applicator tips, while others may require mixing or special tools. An easy-to-use adhesive can save time and reduce mess during installation.
- Drying Time: The drying time of the adhesive is crucial for project planning. Look for adhesives with a reasonable setting time that allows for adjustments while still ensuring a strong bond once cured.
- Water Resistance: If the mirror will be installed in a humid area, such as a bathroom, choose an adhesive that is water-resistant. This feature helps maintain the integrity of the bond in damp conditions, preventing deterioration and mold growth.
- Compatibility with Backing Material: Ensure the adhesive is compatible with the mirror’s backing material, typically a silvered glass. Some adhesives may react negatively with certain materials, so checking for compatibility can prevent damage to the mirror.
- Temperature Resistance: The adhesive should withstand a range of temperatures without losing its bonding capabilities. High-quality mirror adhesives are often formulated to remain effective in both hot and cold environments.
- Non-Toxicity: If you’re concerned about fumes or health impacts, look for a non-toxic adhesive. This is particularly important in enclosed spaces where ventilation may be limited during application and curing.
What Are the Best Types of Mirror Adhesives Available?
The best types of mirror adhesives available are formulated to provide strong, lasting bonds while being compatible with various mirror backings.
- Silicone Adhesive: Silicone adhesive is highly flexible and waterproof, making it ideal for applications in moist environments such as bathrooms. Its ability to expand and contract with temperature changes helps to prevent cracking or breaking of the mirror.
- Epoxy Adhesive: Epoxy adhesives create a very strong bond and are resistant to heat and moisture, making them suitable for heavy mirrors. They typically require mixing two components before application, but they offer excellent durability and strength once cured.
- Mirror Mastic: Mirror mastic is specifically designed for attaching mirrors to walls and is often used in professional installations. It provides a strong bond while allowing some repositioning time, and it’s less messy compared to liquid adhesives.
- Construction Adhesive: Construction adhesives can be used for mirrors as they offer a robust hold and versatility for various materials. They are particularly useful for larger mirrors or when affixing mirrors to surfaces like wood or drywall.
- Double-Sided Tape: High-strength double-sided tape is a convenient option for lightweight mirrors and quick installations. It offers a clean application without the mess of liquid adhesives and can be easily removed if needed.
How Do Silicone Adhesives Compare to Epoxy Adhesives for Mirrors?
| Aspect | Silicone Adhesives | Epoxy Adhesives |
|---|---|---|
| Strength | Good bonding strength, suitable for lightweight mirrors. | High strength, ideal for heavy or large mirrors. |
| Flexibility | Highly flexible, allows for movement without breaking the bond. | Less flexible, can crack under stress or movement. |
| Curing Time | Typically cures quickly, often within a few hours. | Longer curing time, can take up to 24 hours for full strength. |
| Temperature Resistance | Resistant to temperature fluctuations but can degrade in extreme heat. | Excellent temperature resistance, stable in high heat environments. |
| Durability over time | Good durability, but may yellow or lose adhesion over long periods. | Excellent durability, maintains bond strength over time. |
| Water resistance | Highly water resistant, suitable for humid environments. | Water resistant, but prolonged exposure may weaken bond. |
| Application method | Easily applied with a caulking gun or tube. | Requires mixing before application, may need precise application. |
| Cost comparison | Generally less expensive than epoxy adhesives. | Tends to be more expensive due to higher strength and durability. |
What Unique Properties Do Specialty Mirror Adhesives Have?
Specialty mirror adhesives possess unique properties that make them ideal for securely bonding mirrors to various surfaces.
- High Initial Tack: These adhesives often feature a strong initial tack that allows for immediate bonding, which is crucial when positioning mirrors. This property helps ensure that mirrors stay in place during the curing process and reduces the risk of slippage.
- Flexibility: Many specialty mirror adhesives are designed to remain flexible once cured, accommodating any potential movement or expansion between the mirror and the substrate. This flexibility helps prevent cracking or damage to the mirror, even in environments where temperature fluctuations occur.
- Moisture Resistance: The best mirror adhesives are formulated to resist moisture, making them suitable for use in bathrooms or areas with high humidity. This resistance helps prevent the adhesive from degrading over time, ensuring a long-lasting bond.
- Non-corrosive Formulation: Specialty mirror adhesives are typically non-corrosive, which is crucial for protecting the reflective backing of mirrors. This property helps maintain the integrity and appearance of the mirror, preventing tarnishing or other damage that could arise from corrosive substances.
- Fast Curing Time: Many mirror adhesives boast fast curing times, allowing for quicker project completion. This is especially beneficial for contractors and DIY enthusiasts who need to minimize downtime during installations.
- Clear Finish: Most specialty mirror adhesives dry clear, ensuring that there are no visible marks or residues once the adhesive has set. This aesthetic feature is important for maintaining the clean look of the mirror and surrounding decor.
- Temperature Resistance: Some mirror adhesives can withstand a wide range of temperatures, making them suitable for both indoor and outdoor applications. This property ensures that the adhesive will not degrade or lose its bonding strength under varying environmental conditions.
How Can You Ensure Proper Use of Mirror Adhesive?
To ensure proper use of mirror adhesive, consider the following guidelines:
- Surface Preparation: Clean and prepare the surfaces where the mirror will be adhered. This includes removing dust, grease, and old adhesive residues to ensure a strong bond.
- Choosing the Right Adhesive: Select a mirror adhesive specifically designed for the type of mirror and surface. The best mirror adhesive will provide a clear bond and resist moisture, which is crucial for longevity.
- Application Technique: Apply the adhesive evenly and avoid over-application, which can lead to excess squeezing out from behind the mirror. Follow the manufacturer’s instructions regarding the amount and method of application for optimal results.
- Support During Curing: Use temporary support or clamps to hold the mirror in place while the adhesive cures. This prevents movement which can compromise the bond strength.
- Allow Proper Curing Time: Be patient and allow the adhesive to cure fully before handling or applying pressure to the mirror. This ensures the bond is strong and durable.
Surface preparation is crucial as it helps the adhesive to bond effectively. Using a cleaner that is suitable for both the mirror and the wall surface can greatly enhance adhesion.
Choosing the right adhesive is essential; using a product that is specifically labeled as mirror adhesive will ensure that it is formulated to withstand the unique stresses that mirrors are subjected to, such as weight and humidity.
When applying the adhesive, it’s important to use a consistent technique, which can include applying it in a zigzag pattern or dots, depending on the adhesive instructions. This helps achieve an even layer without excessive buildup.
Providing support during the curing process is vital as it prevents any shifts that could affect the alignment and bond of the mirror. Temporary supports can be removed after sufficient curing time.
Lastly, allowing proper curing time is not just a matter of following instructions; it ensures that the adhesive reaches its maximum strength, providing a secure attachment that will last over time.
What Steps Should You Follow to Prepare the Surface for Adhesion?
Preparing the surface for adhesion is crucial to ensure a strong bond, especially when using the best mirror adhesive.
- Clean the Surface: Thoroughly clean the area where the adhesive will be applied to remove dirt, dust, grease, or old adhesive residues. Use a suitable cleaner, such as isopropyl alcohol or a mild detergent, and ensure that the surface is completely dry before proceeding.
- Inspect for Damage: Check the surface for any imperfections such as cracks, chips, or unevenness that may affect adhesion. Repair any damage, as a smooth and intact surface provides a better foundation for the adhesive to bond effectively.
- Sand the Surface: Lightly sand the area to create a rough texture that helps the adhesive grip better. This step is particularly important for glossy or smooth surfaces, as it increases the surface area for adhesion.
- Choose the Right Adhesive: Select an adhesive that is specifically designed for mirrors and suitable for the materials involved (e.g., glass, wood, metal). The right adhesive will ensure durability and resistance against environmental factors.
- Test Adhesion: Before applying the adhesive fully, conduct a small adhesion test on a corner or less visible area. This will help confirm compatibility and effectiveness, ensuring the adhesive performs as expected.
- Apply Primer if Necessary: Some surfaces may benefit from a primer to enhance adhesion. Check the adhesive instructions, as using a primer can improve the bond, especially on porous or non-porous materials.
How Do You Apply Mirror Adhesive Correctly?
Applying mirror adhesive correctly is essential for a secure and lasting bond between the mirror and its backing surface.
- Surface Preparation: Ensure that both the mirror and the wall or surface are clean, dry, and free from dust and debris. Use a mild cleaner and a lint-free cloth to avoid any residue that could weaken the adhesive bond.
- Choosing the Right Adhesive: Select a high-quality mirror adhesive specifically designed for the weight and type of mirror you are using. The best mirror adhesives are usually either silicone-based or specially formulated for mirrors to prevent damage to the reflective backing.
- Application Technique: Apply the mirror adhesive in a zig-zag pattern or in dots along the back of the mirror, ensuring even coverage without overdoing it. This method allows for better bonding and helps to avoid adhesive squeeze-out when pressing the mirror against the surface.
- Pressing and Holding: Position the mirror against the wall and press firmly for a few moments to ensure a good initial bond. It may be helpful to use painter’s tape to hold the mirror in place while the adhesive cures, as this can prevent slipping or falling during the drying process.
- Curing Time: Allow the adhesive to cure fully according to the manufacturer’s instructions, which can vary from a few hours to a full day. Avoid placing any weight on the mirror or cleaning it until the adhesive has completely set to ensure a strong hold.
What Common Mistakes Should You Avoid When Using Mirror Adhesives?
When using mirror adhesives, it is crucial to avoid common mistakes to ensure a successful application.
- Not Cleaning the Surface Properly: Failing to thoroughly clean the surfaces where the adhesive will be applied can lead to poor bonding. Any dust, grease, or moisture can compromise the strength of the adhesive and may cause the mirror to detach over time.
- Using the Wrong Type of Adhesive: Selecting an adhesive that is not specifically designed for mirrors can result in damage to the mirror backing or ineffective bonding. It’s important to choose a product that is suitable for the weight and type of mirror you are working with.
- Ignoring Temperature and Humidity Conditions: Applying mirror adhesive in unsuitable temperature or humidity levels can impact the curing process. Extreme conditions can either speed up or slow down the drying time, leading to an insecure bond or an incomplete setting of the adhesive.
- Overusing Adhesive: Applying too much adhesive can create a messy appearance and might not provide a stronger hold. Excess adhesive can also seep out from behind the mirror, causing aesthetic issues and potentially damaging the wall or surface underneath.
- Neglecting Curing Time: Not allowing adequate curing time before handling or installing the mirror can lead to misalignment or detachment. Always refer to the manufacturer’s instructions regarding the specific curing time needed for optimal results.
- Not Using Proper Support During Curing: Failing to provide support for the mirror while the adhesive cures can result in it slipping or falling. Temporary supports, such as brackets or spacers, should be used to ensure the mirror stays in place until the adhesive has fully set.
How Do Environmental Factors Impact Mirror Adhesive Performance?
Environmental factors significantly influence the performance of mirror adhesives, affecting their durability and effectiveness.
- Temperature: Extreme temperatures can weaken adhesive bonds, with high heat causing softening and low temperatures leading to brittleness.
- Humidity: High levels of moisture can lead to degradation of adhesive materials, potentially causing them to lose their grip over time.
- UV Exposure: Prolonged exposure to ultraviolet light can cause certain adhesives to break down, losing their strength and clarity.
- Surface Preparation: The cleanliness and texture of the surface can affect how well the adhesive adheres; contaminants or rough surfaces can lead to poor bonding.
- Substrate Material: Different materials (glass, plastic, metal) interact differently with adhesives, impacting the bond’s strength and longevity.
Temperature affects the viscosity of adhesives, which can alter how well they flow and bond to surfaces. In hot conditions, adhesives might become too fluid, while in cold conditions, they may not cure properly.
Humidity plays a critical role as excess moisture can lead to mold growth or a breakdown of the adhesive matrix, reducing its effectiveness over time. It’s essential to use adhesives that are specifically formulated for high-humidity environments when necessary.
UV exposure can be particularly damaging for adhesives not designed to withstand sunlight, leading to discoloration and loss of adhesion strength. Choosing UV-resistant adhesives is crucial for outdoor applications.
Surface preparation is vital for ensuring a strong bond; surfaces must be clean and dry, as oils, dust, or other contaminants can inhibit adhesion. Properly preparing surfaces can significantly enhance the performance of the adhesive.
The type of substrate also determines adhesive performance; for example, some adhesives are better suited for porous surfaces, while others are designed for non-porous materials. Understanding the surface characteristics can help in selecting the best adhesive for the job.
Related Post: